
Ah, the waistcoat stitch. The crochet version of the knitted stockinette stitch. A.k.a. the knit stitch. Or the “v” stitch. Or, if we wanted to get more technical, the center crochet stitch, or the split single crochet.
Sounds impressive, doesn’t it? However intimidating some of these names may be, though, don’t let them fool you into thinking waistcoat stitch is complicated.
I like to think of waistcoat stitch as humble single crochet’s flamboyant twin. If you know how to work a single crochet, you know how to crochet the waistcoat stitch. That is because the latter is finished exactly the same way as the former. The striking difference in their final looks depends solely on hook placement. Before we exactly pinpoint where to insert the hook – and where the hook should exit on the back side – let’s have a look at a typical waistcoat stitch up close.
Anatomy of a waistcoat stitch
Front view:
The front and back loops of the stitch sit above the post arms. The left and right post arms form a distinct “v” shape.

Back view:
The backs of the stitch’s post arms form a “v” as well. Front loop of the stitch is not visible in this view, but the “ridge” – also called the third loop – is clearly defined just under the back loop, and above the post arms.

Hook placement
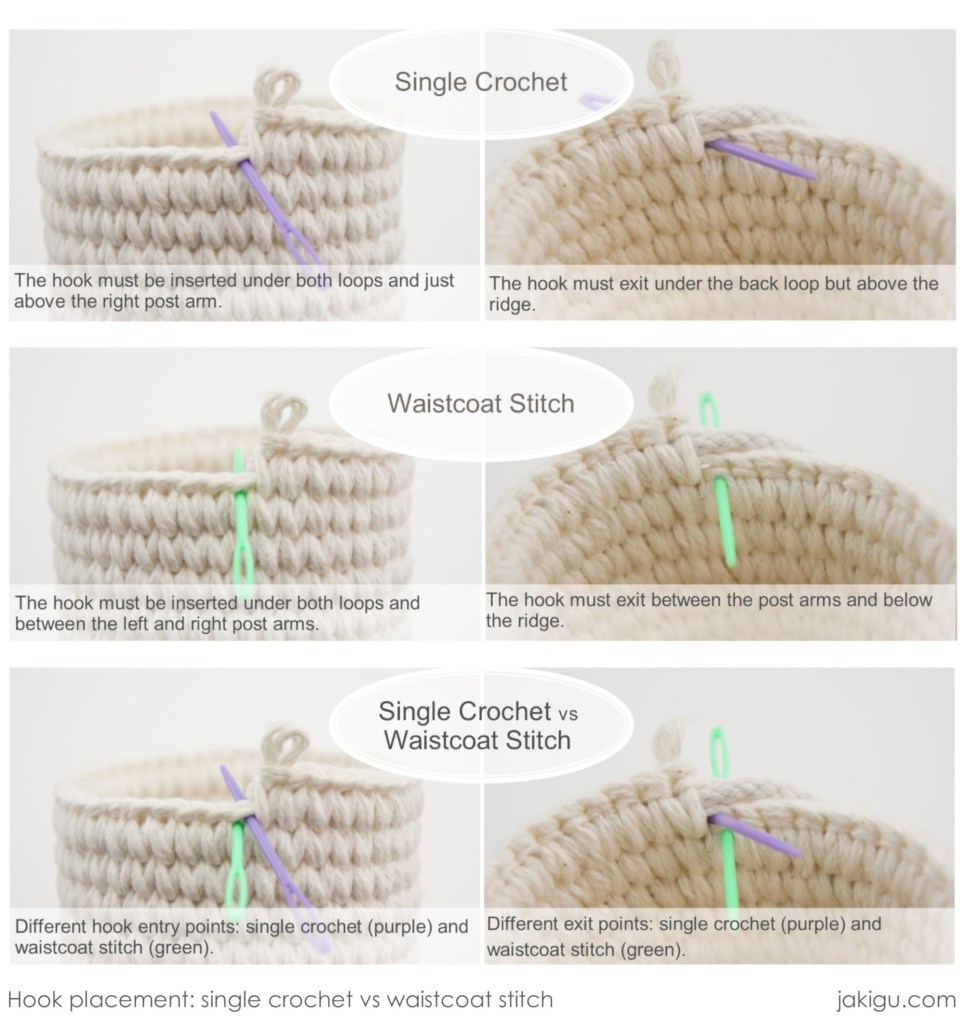
When working a single crochet, we insert the hook under both loops (i.e. under the front and back loop), and just above the right post arm. The hook exits on the back under the back loop, but above the ridge.
When working a waistcoat stitch, we insert the hook under both loops and right between the post arms. The hook must exit on the wrong side between the post arms and below the ridge.
Waistcoat stitch, step-by-step
Once hook placement is clear, working waistcoat stitch is as simple as working a single crochet.
Most of my crochet designs are crochet baskets, and majority of those are executed in coiled crochet technique. As I created this tutorial primarily as a supplemental resource for my customers, I chose to include images of waistcoat stitch worked over a coil in this pictorial. Steps would be identical if you were working the stitch without a coil.

Video
Check out the video to see the execution of this stitch in action. Pretty easy, isn’t it?
Waistcoat stitch uses
For inspiration, have a look at my Pinterest board devoted to the waistcoat stitch.
This versatile stitch is generally used for garments, such as hats and mittens. Though it can be used in rows, it is best suited for projects crocheted in the round. Garments crocheted in waistcoat stitch mimic knit fabric in both look and stretch. This stretch is achieved by working the stitches very loosely, and usually with a hook one or more sizes larger than the chosen yarn would normally call for. Traditionally, this stitch requires the crocheter to maintain relaxed stitch tension throughout their work as roomier stitches make inserting the hook into the stitch post much easier.
But you know me! I never follow instructions, and I love to experiment. Of course, I am well aware that crocheters the world over are using this stitch to make baskets. I claim no breakthrough there.
My nonconventional twist on using waistcoat stitch in crochet basketry is two-fold. First of all, I now crochet all my baskets over a coil. A coil gives a basket bulk and a sturdy foundation – and completely eliminates the stretch of the crocheted fabric. To boot, I use a much, much smaller hook that you’d ever thought possible when working basket waistcoat stitches. The resulting tight, compact stitches bind to the coil, and together they help create my dream type of basket: stiff, sturdy, and durable. If that’s your kind of basket, too; waistcoat stitch and coiled crochet are your ticket to basket paradise.
Tips and tricks
There are a couple tricks I would like to share with you before I leave you to choosing a crochet project, so you can try this versatile crochet stitch.
Always check back of your work: the hook needs to exit through in between the post arms, under the back loop and the ridge. No matter how hard you try, every now and then the hook will exit on the backside kind of out of place. With practice, that will happen less and less frequently.
If you’re working on something stretchy, like a hat or a cowl, work loosely. Use a crochet hook 1 to 2 sizes larger than the size you’d normally use for that yarn weight. This will not only make stitches easier to work, it will also add to fabric’s stretch.
If, on the other hand, you’re trying to create a stiff fabric (like I do, when I crochet my baskets), always opt for a smaller hook and work your stitches as tight as you can – ideally over a coil. If inserting the hook into a post seems difficult, use a thick, blunt tapestry needle to create a pilot hole for the hook. Just insert it in between the post arms, and wiggle it a little side-to-side. Then, work the stitch as usual. While a little more time consuming, finishing the stitch with this more precise instrument is way easier – and you can be sure the hook will enter and exit precisely where you want it to.
JaKiGu designs in waistcoat stitch
And now there’s nothing left than to choose a project on which to test all your waistcoat stitch knowledge. Below are a few of my favorite waistcoat stitches designs from my pattern shop. And since you’ve read this post all the way to the end, I am just going to go ahead and assume this awesome stitch intrigues you. So go ahead and give it a try – with a 50% discount. Add the pattern to your cart, and use coupon code WAISTCOATPRO at checkout.


If you have any questions, don’t hesitate to ask. I’m here to help.
Leave a Comment